How soldiers tuned into the world with nothing but a razor blade, a coil of wire, and ingenuity!
During World War II, American GIs stationed in the field found clever ways to stay connected to the outside world. Without access to proper equipment, they built working radios from whatever they could scavenge — a razor blade, some copper wire, a pencil stub. These foxhole radios required no battery, no power source of any kind. They pulled energy directly from the radio waves themselves. Decades later, you can build one too.
This is similar to a crystal radio — one of the oldest radio designs in existence — but the soldiers’ version swapped out the hard-to-find galena crystal for a blued razor blade and a pencil lead. The result is a semiconductor detector built from almost nothing, a genuine piece of engineering improvisation that still works today.
“Radios were the hottest technology of the time — and after the exhilaration of getting this radio to work, I can understand.”
How It Works
A foxhole radio is a type of passive receiver — it harvests the tiny amount of electrical energy carried by AM radio waves and converts it directly into sound in your earphone. There is no amplification, no battery, no active components. Everything runs on the signal itself.
The coil (inductor) and the antenna work together to resonate at a specific radio frequency, filtering out everything else. The detector — the blued razor blade and pencil lead — acts as a crude diode, allowing current to flow in one direction only. This strips away the carrier wave and leaves the audio signal behind. That signal then travels to your earphone as sound.
The graphite in the pencil lead pressing against the oxidized surface of the razor blade forms what’s called a point-contact semiconductor junction — essentially the same physics that underpins modern transistors, discovered long before anyone had a name for it.
What You’ll Need
- Toilet paper tube (cardboard coil form)
- Magnet wire (thin enameled copper)
- Razor blade (single edge)
- Wood pencil stub
- Large safety pin
- Crystal earphone (high impedance)
- Scrap of wood (baseboard)
- Brass tacks & paper clips
- Long wire antenna (25 ft+)
- Ground wire & connection
A note on the razor blade: you want a blued single-edge blade — one with a dark blue-grey oxide coating on its surface. “PAL Super Single Edge” blades were known to work well. If you can’t find a pre-blued blade, you can create the oxide layer yourself by heating a plain steel blade with a propane torch until it turns a blue-grey colour, then letting it cool completely. Do not use stainless steel — it won’t oxidize correctly.
The earphone must be a high-impedance crystal earphone (also called a piezoelectric earphone). Standard modern earphones or earbuds will not work — they have far too low an impedance and won’t produce any sound from the tiny signal levels involved.
⚠ Safety First Handle razor blades with care — they are exceptionally sharp. When bluing a blade with a torch, work in a well-ventilated space, keep flammable materials well clear, and let the blade cool fully on a non-combustible surface before touching it. Never erect an outdoor antenna during a storm or when lightning is possible. Radio antennas can attract lightning strikes.
Building It Step by Step
1. Wind the Coil
Take your toilet paper tube and wind the magnet wire around it approximately 120 times, keeping the turns tight and packed closely together. Secure the starting end by poking it through a small hole in the tube. The number of turns affects which frequency you receive — 120 is a good starting point for the AM broadcast band. If you’re receiving a station but it sounds slightly off, try adding or removing a few loops to tune in.
2. Prepare the Detector (Razor Blade)
Mount your blued razor blade flat on the wooden baseboard using a brass tack through one of its holes. The oxide surface is your detector — don’t sand or scrape it. Connect a wire from the blade’s tack to one end of your coil. This is the heart of the radio: the blade’s oxidized surface, when touched by the pencil lead, forms a primitive semiconductor junction that rectifies the radio signal.
3. Make the Cat Whisker
Take a pencil stub and push a safety pin through it so the pin’s point makes contact with the graphite core. Mount this assembly so the pin tip rests lightly on the surface of the razor blade — you should be able to slide it to different positions. The exact spot where the pin touches the blade makes a significant difference to reception; you’ll need to experiment. This adjustable contact is called a cat whisker, a name dating back to the earliest days of wireless.
4. String the Antenna
Run a long wire — at least 25 feet, longer if possible — out a window or up as high as you can manage. You can strip a single conductor from a Cat5 or Cat6 ethernet cable. Connect this antenna wire to one end of your coil. The longer and higher your antenna, the stronger your signal. Keep it away from power lines.
5. Make a Ground Connection
A solid earth ground is critical — this is the most common reason foxhole radios fail. Connect a wire from the other end of your coil to a reliable ground: a metal water pipe, a central heating radiator, or a metal rod driven into moist soil. Connect the other terminal of your earphone to this same ground. A poor ground connection gives you buzz instead of a station.
6. Wire the Earphone
One terminal of your earphone connects to the cat whisker (the safety pin side). The other terminal connects to ground. Use paper clips and brass tacks to make connections on the baseboard — this is exactly how the GIs did it, and it works perfectly well. ANTENNA COIL (120 turns) GND BLADE CAT WHISKER EARPHONE
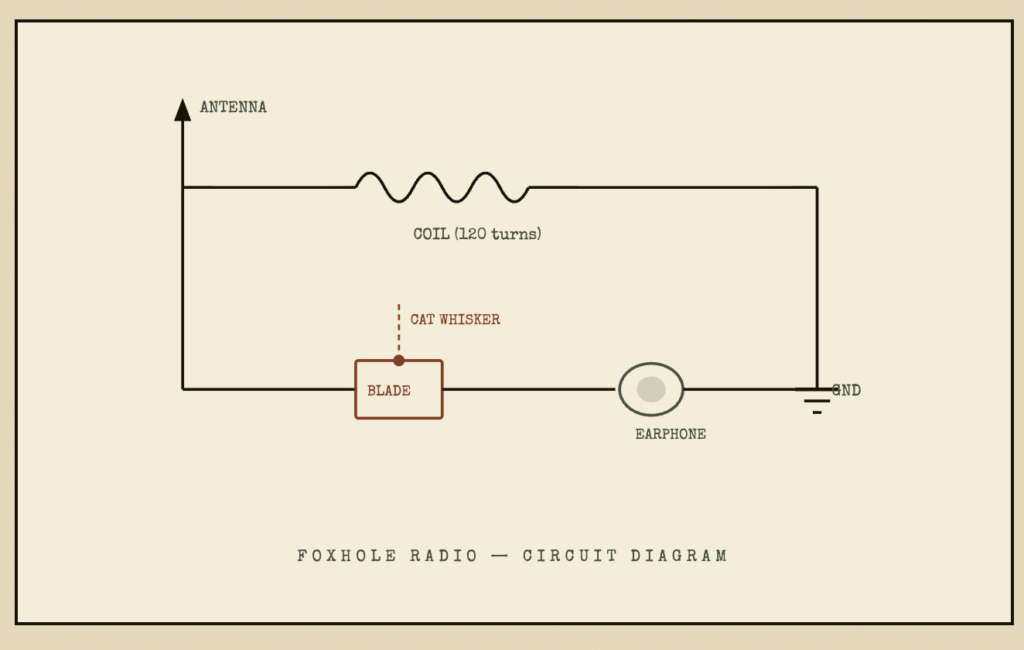
Foxhole Radio — Circuit Diagram
Troubleshooting
Don’t be discouraged if it doesn’t work immediately — this is normal, and working through the problems is half the fun.
If you hear only buzzing with no station, the most likely cause is a poor ground connection. Check every connection point and make sure the ground wire is making solid metal-to-metal contact.
No Sound At All
Check that your earphone is the right type (high-impedance crystal, not a standard headphone). Verify every connection along the circuit. Try moving the cat whisker to different spots on the razor blade surface — the contact point is surprisingly sensitive.
Buzzing But No Station
Almost always a grounding issue. Re-make your ground connection to ensure bare wire is in firm contact with metal. Also verify the cat whisker isn’t pressing too hard or too soft — a light touch works best.
Very Faint Sound
Extend your antenna. Try a different spot on the razor blade. Make sure the oxide layer on the blade is intact and you haven’t accidentally scraped it off. If you’re in an area with weak AM coverage, you may need to add more turns to your coil to tune to a stronger nearby station.
The position of the pencil lead on the razor blade is everything. Move it slowly around the blade surface — you’re looking for a sweet spot where the semiconductor junction is most effective. Soldiers in the field learned the feel of their particular blade over time.
A Note on the Science
The detector in this radio — graphite pressing against an oxidized steel surface — is functioning as a point-contact diode. A diode allows electrical current to flow in one direction but blocks it in the other. AM radio signals are alternating current oscillating at hundreds of thousands of times per second. The diode rectifies this signal, converting it into pulsing direct current that follows the audio waveform encoded in the broadcast.
In a crystal radio, a piece of galena mineral does the same job more reliably. In the foxhole radio, the oxide layer on the blade (iron oxide, essentially a form of rust or heat-treated magnetite) provides just enough semiconductor behaviour to do the trick. It is, in effect, a hand-made semiconductor — the same underlying physics as the transistor that would be invented just a few years after the war ended.
No amplification means the signal driving your earphone is extremely weak. High-impedance crystal earphones are essential because they’re designed to work efficiently with tiny signal levels. A standard low-impedance headphone would load the circuit down and produce nothing.
Make It Your Own
Once you have a working radio, there are many ways to develop it further. Adding a variable capacitor in parallel with the coil turns it into a tunable radio, letting you select between stations rather than receiving whichever is strongest. You can also experiment with different coil lengths: more turns shifts reception toward lower frequencies, fewer turns toward higher ones.
If you want a ready-made kit with quality components, the Borden Radio Company makes excellent foxhole and crystal radio kits with pre-blued detector assemblies and proper high-impedance earphones.
There is something quietly remarkable about holding a device made from a cardboard tube and a razor blade and hearing a voice come through your earphone — voices carried on invisible waves, harvested without a single battery. The GIs who built these by lamplight knew the feeling well. Build Something Real · No Batteries Required · Amateur Radio & Making